Event Recording Management
Last updated: May 10, 2023
Essential and Suite subscribers can record their Events and make them available to Registrants after their live webinar. Event recordings help Organizers reach more Attendees by allowing them to register for and view the recorded event when their schedule allows.
Hosting
- For Essential subscribers, Event Recordings are hosted with EventBuilder for 30-days.
- For Suite subscribers, EventBuilder hosts recordings and other file types as long as your subscription is active with us.
- Additionally, Suite subscribers can upload and/or replace an older recording with a new, updated recording.
Recording Your Event
Recording a live event is as simple as selecting the option on the Schedule step during your Event build. The option is also available to select on Templates, setting all Events created with that Template to be recorded.
On the Schedule section of your Event build, enter your Meeting URL in the field provided:

Once the Meeting URL has been added, the option to record your Event will appear:
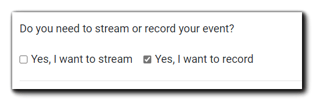
Select "Yes, I want to record."
Note: You may add the option to record the Event up to one hour prior to the scheduled start, after which all items on the Schedule section are locked.When building Templates, simply select the applicable available options:
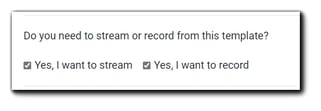
Events built on the Template will have 'Yes, I want to record" pre-selected.
The EventBuilder Bot
Event recordings are made possible with EventBuilder's bot. This piece of technology records, streams, and saves the presentation for later playback.
What the bot records - If Recording is enabled, EventBuilder's bot records the presentation environment from the Attendee's perspective, including slide decks, desktop sharing, whiteboards, and presentation-related video.
The bot joins the Teams presentation environment 30 minutes prior to your Event's scheduled start time. If a Teams lobby is enabled, let the bot into the Teams room, and then mute the bot's microphone upon entering.
Post-Event Recording Management
Once complete, the recording file is automatically added to the Event and located in the Schedule section of the Event build. The recording is available for viewing shortly after the live Event.
The bot will post a link to the recording on the original Registration page. Organizers may also elect to send a system-generated email to distribute the recording link to Attendees and/or Registrants who missed the Event.

Select 'Edit' if you would like to crop the beginning and/or end of your recording and/or add chaptering. The following will appear:
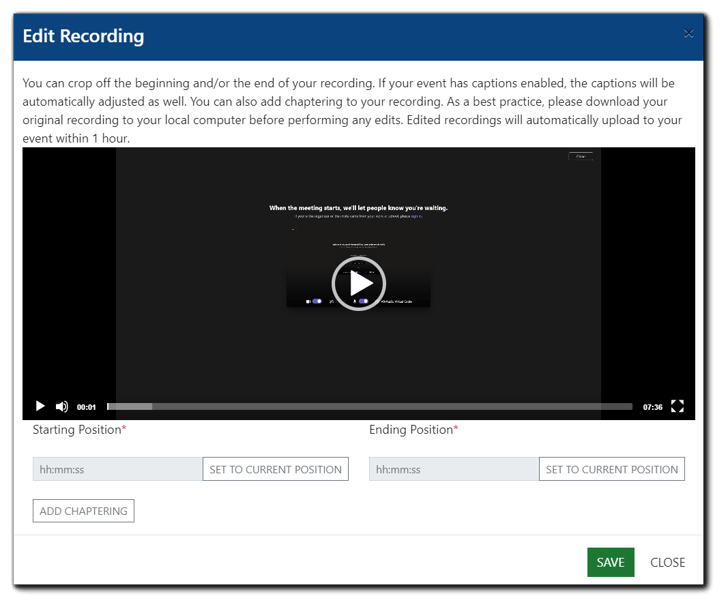
Image text: You can crop off the beginning and/or the end of your recording. If your event has captions enabled, the captions will be automatically adjusted as well. You can also add chaptering to your recording. As a best practice, please download your original recording to your local computer before performing any edits. Edited recordings will automatically upload to your event within 1 hour.
Select a Starting Position and/or an Ending Position and click 'Save.' The edited recording will be automatically uploaded to your Event within 1 hour.
To add chaptering to your recording, select the 'Add Chaptering' button. The following will appear:

Choose the name, starting position and ending position of the chapter you wish to add. Click on the + button to add additional chapters. When complete, click 'Save.'
Additional options for recording management:
- Select 'Download' to save your Event recording on your own local or cloud storage (for data retention purposes.)
- Select 'Clear' if you wish to delete the recording from your Event, or no longer want it to be available to those who visit your Registration page.
- Suite-level subscribers can also upload and replace their original recording with updated or edited versions.
On-Demand and Simulated-Live
Suite-level subscribers have access to both On-Demand and Simulated-Live Event Modes, which utilize EventBuilder's Streaming Console.
After selecting On-Demand or Simulated-Live Event Mode, the Recording field will appear:

Click 'Browse,' and the 'Select File' dialog will appear. Click 'Select' next to the recording you wish to add to your Event, or upload a file from your computer/cloud storage. After the recording has been uploaded, your Event build will continue as expected.
Additional Resources
.png)