Live Event Guide: Streaming Mode
Updated: April 27, 2023
Note: Organizers and Moderators have the same rights and privileges for live events. It's not necessary for an Organizer to also add themselves as a Moderator when building their Event. For the purpose of this User Guide, both roles will be referred to as Moderators.
Learn more about the Attendee Viewing Experience
Accessing the Moderator Console
Moderators and Presenters can join Events up to an hour early to upload files, post announcements, etc. At 30 minutes before the scheduled start time, you will have access to your Event controls. This time can be used to test connectivity, prepare content for the Event, and see/hear what the Attendee experience will be like during the live event.
From your Events list, open the EventBuilder Console by clicking on the green console icon
 Join the presentation environment by clicking on the Microsoft Teams icon.

Using Your EventBuilder Console
The streaming console provides Moderators with options and controls to assist them in keeping their Event on track. Some tips on controlling the EventBuilder stream via the Moderator Console:
Controlling the Stream
- Your Event will automatically start and end at the scheduled time. Take control of the start time by clicking Delay 15 minutes.
- If you are ready to begin before the scheduled start time, click Start Stream up to 30 minutes before the scheduled start time.
- To extend the duration of your event, click Extend 15 minutes.
- You can click Delay 15 Minutes or Extend 15 minutes to give yourself additional time. These buttons can be pressed multiple times.
- To stop the stream before your scheduled end time, click End Stream.
Ending the stream permanently ends the Event. The Event stream cannot be restarted. The following confirmation dialog will appear when the 'End Stream' button is selected:
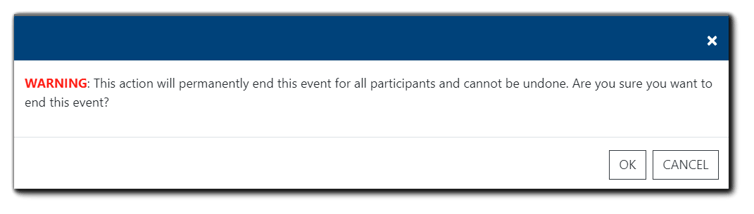
Image text: WARNING: This action will permanently end this event for all participants and cannot be undone. Are you sure you want to end this event? Ok/Cancel.
After selecting 'Ok' to end the stream/Event, the following notification will appear:
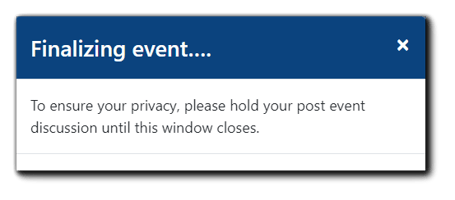
Image text: Finalizing event...To ensure your privacy, please hold your post event discussion until this window closes.
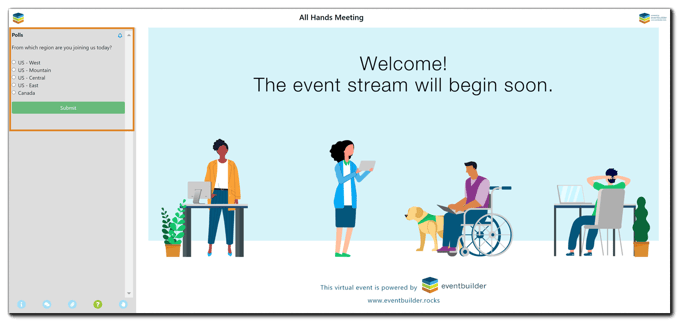
Note: Attendees can join the console up to 30 minutes before the scheduled live start time, where they can respond to polls, view announcements, etc. They will be able to hear audio and see the presentation once the Moderator has initiated the stream.
Console Controls
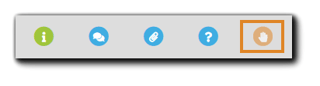
Moderators have several widgets available in their Console to customize the Moderator's view. To open a widget, click on the blue '+' as indicated below:
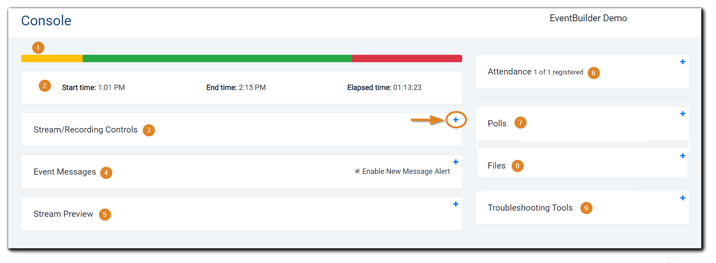
Available widgets and controls:
- Stream Indicator
- Schedule
- Stream/Recording Controls
- Event Messages
- Stream Preview
- Attendance
- Polls
- Files
- Troubleshooting Tools
Stream Indicator (1, 2)
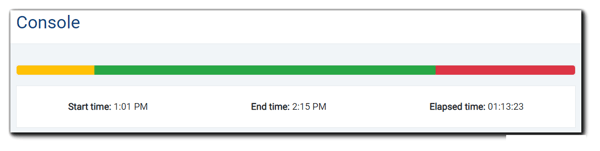
The top of your Moderator Console gives Moderators a snapshot of the streaming schedule.(1) The yellow portion indicates the pre-conference time, green indicates when the event will be streamed to Attendees, and the red indicates the end of the stream. Times are listed,(2) and will adjust if you choose to delay and/or extend your stream. Once your stream is live, this area will turn green:

Stream/Recording Controls & Meeting Controls (3)
Prior to your scheduled start time, the Stream/Recording Controls will have 'Start Stream' and 'Delay 15 Mins' options. Once the 'Start Stream' button has been selected, the options will change to 'End Stream' and 'Extend 15 Mins.' These options assist Moderators in assuming control of the stream, which is set to automatically start and end at the Event's scheduled times.
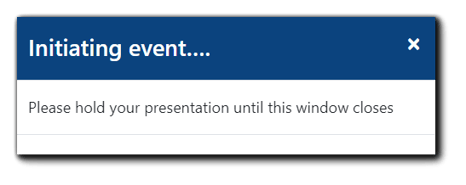
 Upon selecting 'Start Stream,' a message will appear asking you to confirm you want to start the stream. Then, a message informing you the stream is initializing will appear.
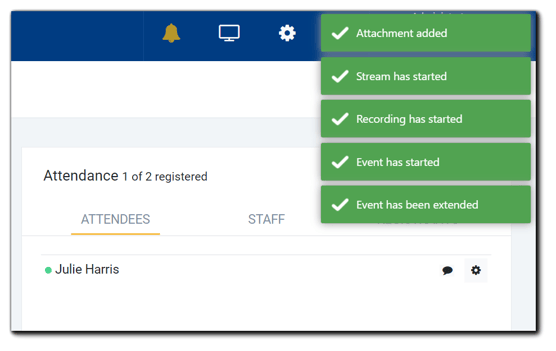
 Once it clears, the top right of your console will indicate your stream has begun and you can begin your Event:
Meeting Controls
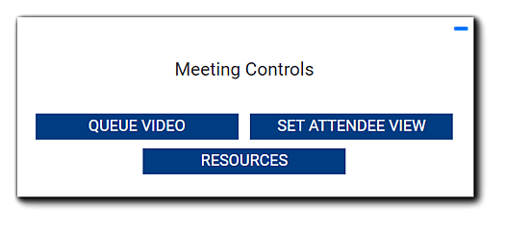
The Meeting Controls options allow you to control the Attendee viewing experience:
Queue Video - Selecting 'Queue Video' button will download the MP4 file to the EventBuilder bot. Users have the option for videos to auto-start upon starting the stream.
Set Attendee View - Select the panel you would like to appear to the left side of your presentation in the Attendee console. Choose from Information (default), Messages, Files, or Polls.
Resources - If you added resources those links are available for Moderators to access here.
Please refer to the article, 'Playing Videos During Your Live Event' for video queue options and instructions.
Event Messages and Attendee Sentiment Controls
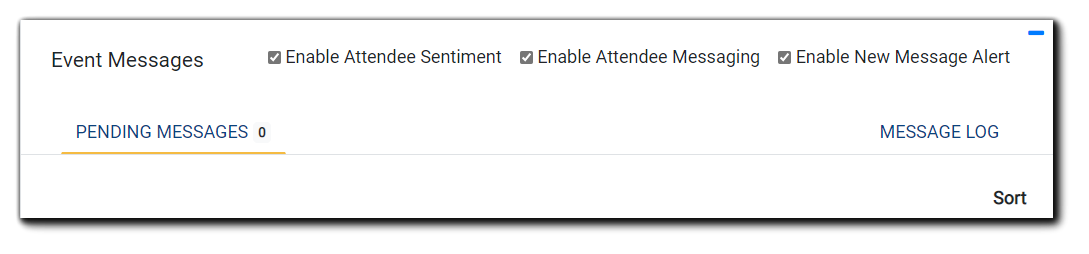 Enable Attendee Sentiment - When selected, Attendees have the option to indicate a 'thumbs up' or 'thumbs down' in their viewing console as a response. Disabling the Attendee Sentiment option deletes all previous sentiments Attendees have responded to.
Enable Attendee Messaging - Moderators can select whether or not Attendees can send messages during the event. This setting can be changed at any time. Note: Disabling this feature will prevent Attendees from sending questions, comments, or requesting support.
Enable New Message Alert - When selected, a sound will play when a new message arrives in the Event Messages interface from your audience. 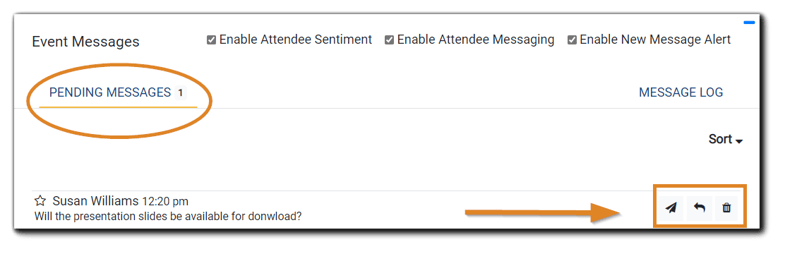 Pending Messages: The Pending Messages view displays messages sent by Attendees. Moderators have three options for managing Pending Messages:
- Post Attendee question to all. If selected, the question will appear to all Attendees in the viewing console immediately. Personal information, such as name, is removed. - Reply to Attendee(s), either direct message or to all.
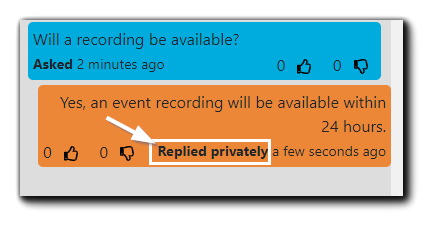
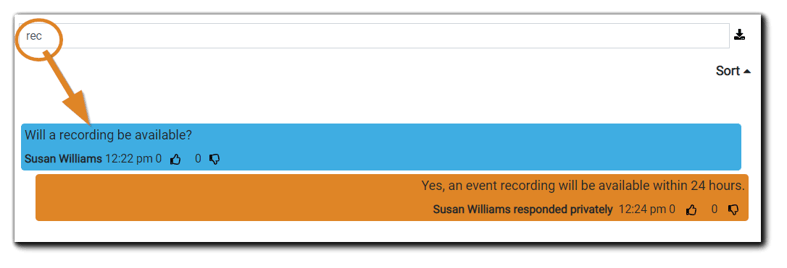
 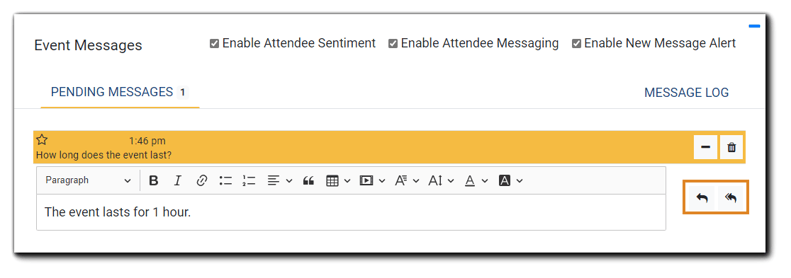 Click on the single response arrow to reply to the Attendee privately. Your response will appear in the Attendee's messages panel, with an indication the message was sent privately:
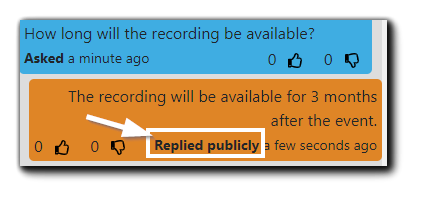
Click on the double arrow icon to reply publicly to all Attendees. Both the question and response are sent to the Messages panel, with the name of the Attendee asking the question removed to maintain anonymity.
Note: Once a response has been sent the message is removed from the Pending Messages view.
To close the message composer without sending a message, click on the black line icon: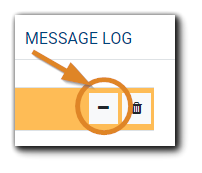 Delete Pending Message without response
Message Log: The Message Log view displays all messages, responses, and announcements for your reference if you wish to review the message history. Messages can be sorted by time stamp (oldest-newest or newest-oldest).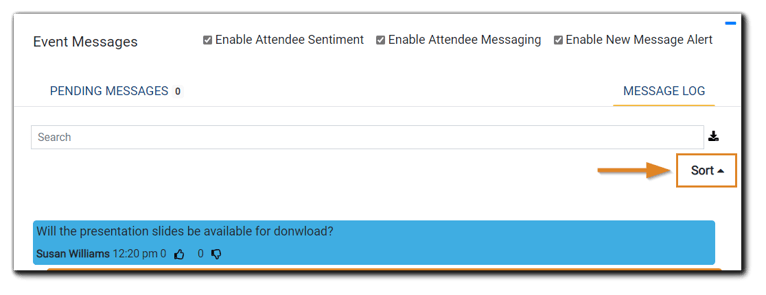
Download Message Log: To download the Message Log, click on the down arrow icon:
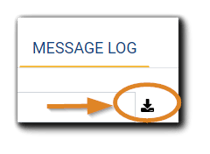
Message Logs are saved in .txt format.
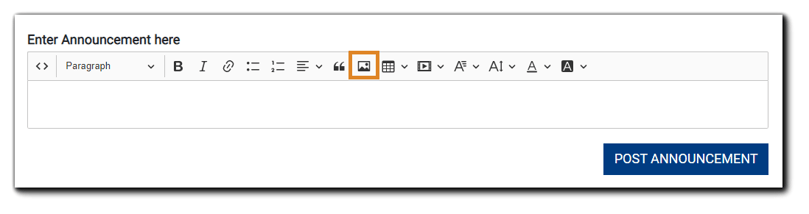
Announcements are located at the bottom of the Event Messages view, allowing Moderators to post information to all Attendees. Type your announcement in the text box and click Post Announcement: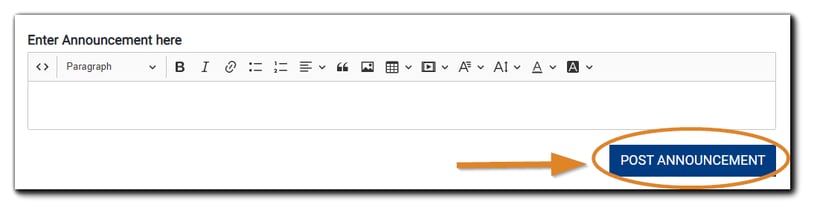
The Announcements tool is a full-featured HTML editor. Moderators may post links, tables, headers, and images in the Console's Announcements. To add an image, click on the 'Image' icon highlighted below:
 The 'Image Editor' dialog will appear, and Moderators may select an image already available, or upload a new image.
Announcements can be searched, edited, or deleted under the Message Log.
To Search the Message log, type your search term in the field provided:
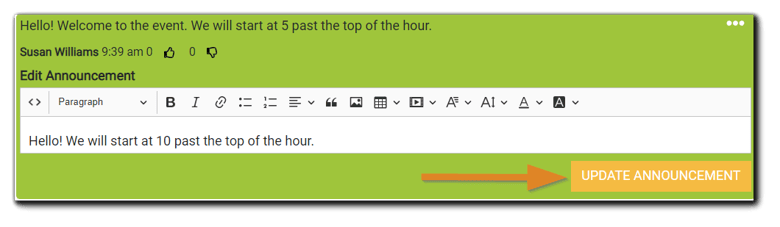
To Edit/Delete messages/announcements, hover your mouse over the right corner of the message you wish to edit/delete. Three dots will appear. Click on the three dots, and select the option you wish from the pop out menu that appears.
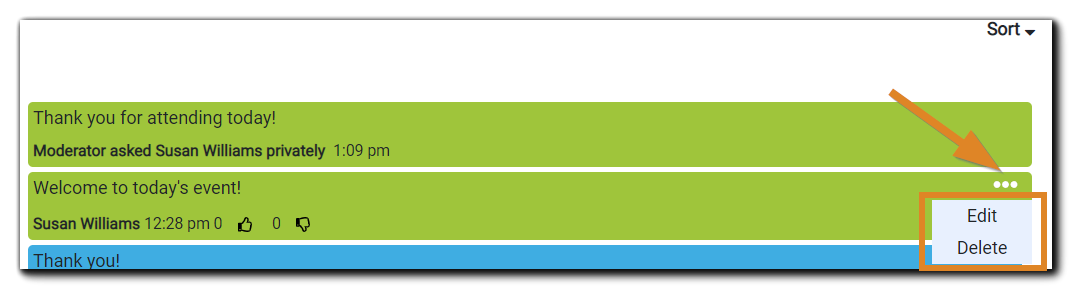
Selecting 'Delete' will erase the message from the Messages Log. When 'Edit' is selected, the HTML editor will appear. Update the message as needed, then click 'Update Announcement.'
 Stream Preview (5)
Stream Preview is visible at the bottom of the EventBuilder console. Once content has been presented (PowerPoint, whiteboard, desktop share, webcam) this view allows you to confirm that content and audio are streaming as expected.
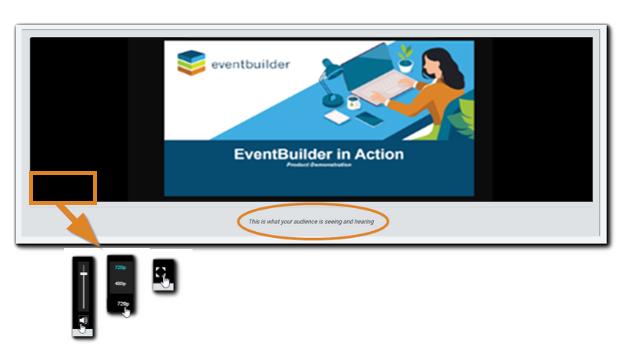
In the lower left-hand corner of the preview window, three controls will appear when Moderators hover their mouse over the area: Stream Volume Control, HD or SD Video, and Full Screen.
Audio Control: To ensure your audio is connected to the stream, unmute the preview using the volume control tool. Speak while connected to Teams. Please note: There is approximately an 8-12 second delay between when you speak in your presentation environment and when you will hear it on the preview. After you have verified audio, make sure to re-mute the preview to avoid distraction.
Video Quality: HD (1080p) or SD (480) video - Moderators can toggle between Standard or High Definition video streaming if they are experiencing bandwidth or resource management issues.
Full Screen: Moderators can view the preview in full screen by clicking on the square icon in the preview controls.
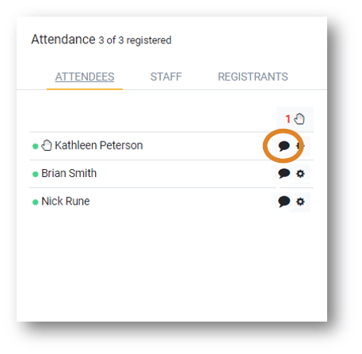
Attendance (6)
The Attendance widget gives Moderators information and options for Attendee, Staff, and Registrant Management. Attendance for your Event is organized in three views:
Attendees: People who are currently in your live event.
Staff: Everyone with Presenter, Moderator, or Organizer privileges.
Registrants: Everyone who registered for your event
 Raise Hand: Ask an informal verbal question and receive instant results by asking them to raise their hand. View the results on the Attendance Pane. Quickly dismiss the raised hands by clicking the raised hand tally or individually by clicking the hand next to their name. Please note: responses to raised hands are not recorded.
The raise hand feature as it appears on the Attendee viewing console:
Private Message: Click on the chat icon to send a private message to the chosen Attendee.
The following dialog will appear:
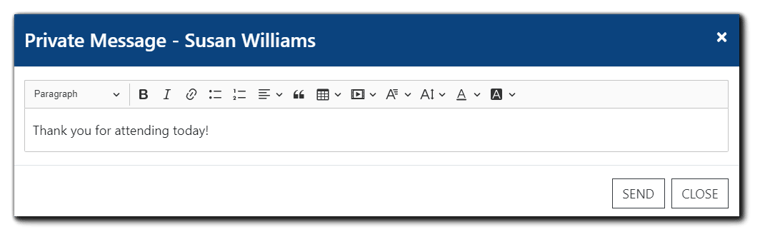
The selected Attendee will receive the following in their viewing console:
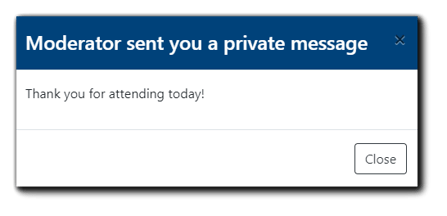
To clear the message, the Attendee will click 'Close.' The message will appear in the Messages Panel.
Attendee View Features:
Moderators can click on the gear icon in the Attendee widget to access information and take specific actions for individual Attendees. Note: Presenters do not have access to Attendee View Features.
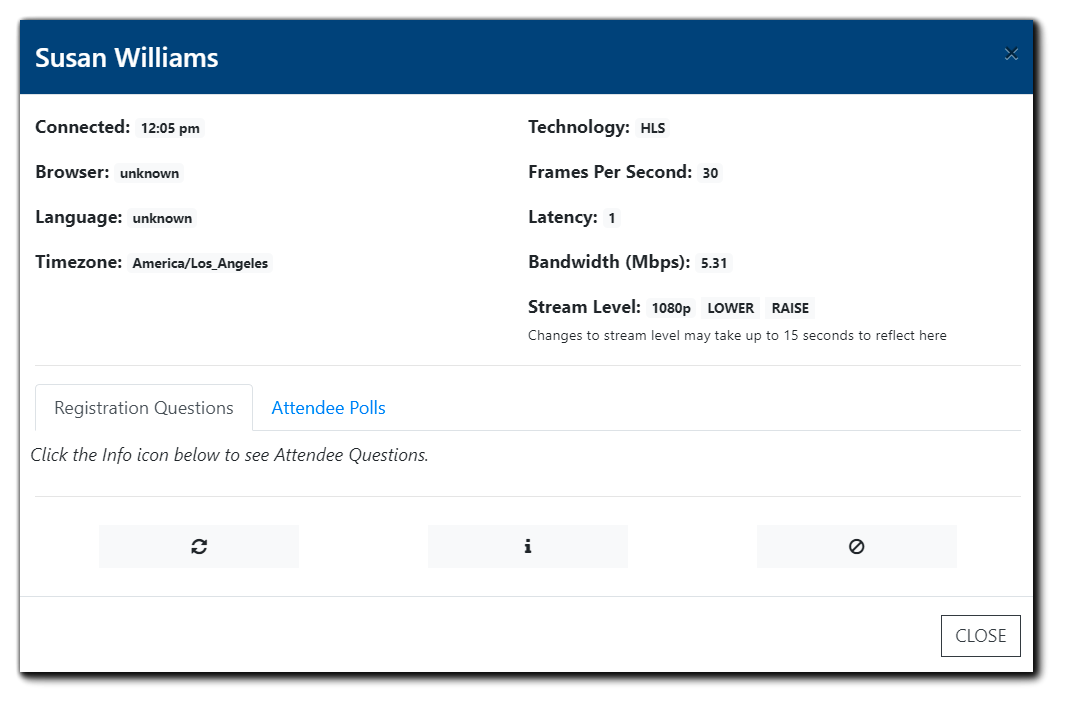 Information provided includes:
| Time Connected | Technology |
| Browser Type and Version | Frames Per Second |
| Language | Latency |
| Time Zone | Bandwidth |
| Stream Level |
Available Actions:

1. Refresh Attendee Browser this button resets the stream that the Attendee is receiving and resolves nearly any viewing anomaly.
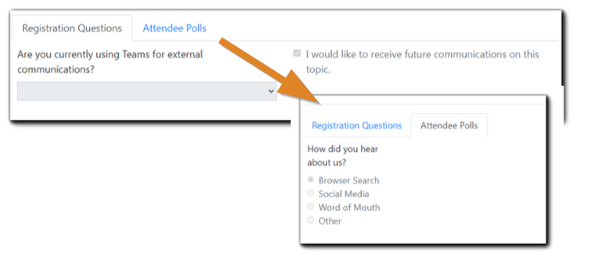
2. Information provides Moderators with the Registration questions asked of the Attendee at the time of Registration, and view poll questions asked and answered during the live event.
3. Block Attendee removes an Attendee from your Event.
Polls (7)
Moderators can add polls to their Events while building them, or on-the-fly during the presentation.
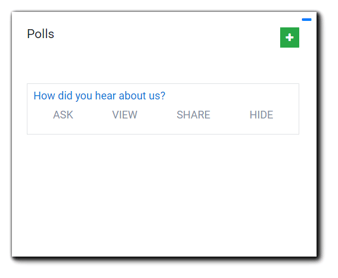
To view poll results in the Moderator console, select 'View.'
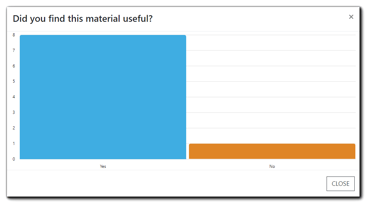
Click 'Share' to allow Attendees to see poll results:
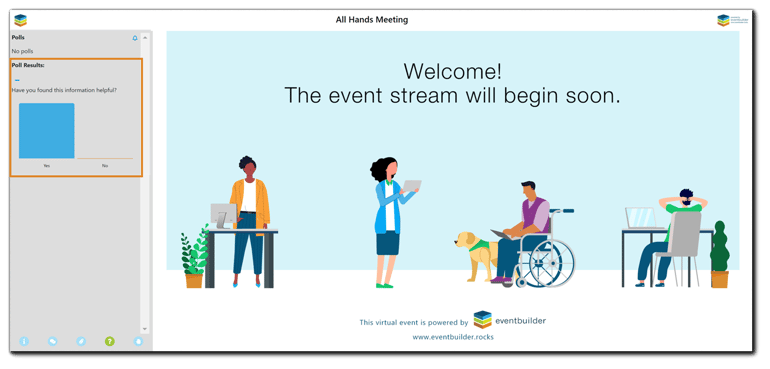 To hide the poll/results from Attendee's viewing console, select 'Hide.'
Files (8)
Moderators can upload files for their event during the Event build, or on-the-fly during the Event. If there are files already attached to the Event, they will appear in the widget:
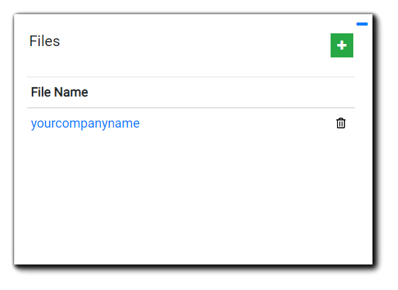 To add a file during your live event, click on the green '+' in the upper right corner of the widget. Your files dialog window will appear. From here, you can upload a file or choose from a file already available. To make the file available to Attendees after upload, click 'select.'
When a file is uploaded a paperclip icon will appear on the Attendees viewing console controls. They can click the icon and download the files you add. You can add as many files as you like, either when you are building your Event or adding them from the Files widget.

Troubleshooting (9)
Live Streaming:
If Attendees are experiencing technical difficulties with their stream, Moderators have several tools to help Attendees troubleshoot and continue their viewing experience.
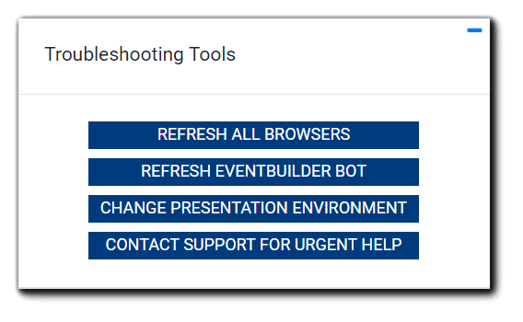
Refresh All Browsers - Reset the stream Attendees are receiving. This action typically resolves most viewing issues.
Refresh EventBuilder Bot - Reset and reconnect the EventBuilder system to your presentation environment if your content and audio are not operating as expected in the stream. Note: this action will interrupt Event presentation and recording. Should a refresh be necessary, please inform your Presenter.
Change Presentation Environment - Allows the EventBuilder system to join a different presentation environment on-the-fly, Moderators and Presenters will need to connect to the new presentation environment.
Note: Organizers can change the presentation environment. Organizers cannot change the presentation platform. E.g., Teams to Teams Live Event.
Contact EventBuilder for Help - Opens a new email addressed to EventBuilder's Care team, including the subject line "LIVE EVENT HELP" and the event's registration link.
Simulated Live:
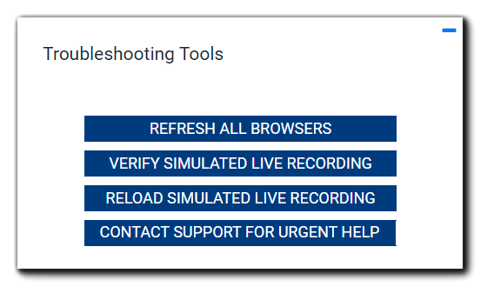
Refresh All Browsers- Reset the stream Attendees are receiving. This action typically resolves most viewing issues.
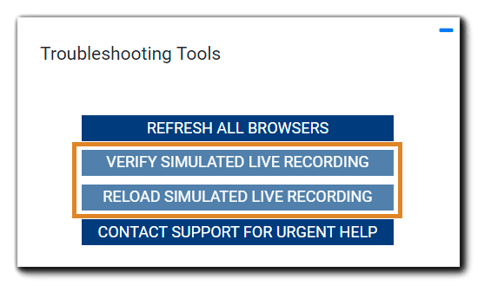
Verify Simulated Live Recording - Click to view the first 30 seconds of the recording.
Reload Simulated Live Recording - Re-download the recording. A notification will appear when the download is complete.
Contact EventBuilder for Urgent Help - Opens a new email addressed to EventBuilder's Care team, including the subject line "LIVE EVENT HELP" and the Event's registration link.
Note: The troubleshooting tools "Verify Simulated Live Recording" and "Reload Simulated Live Recording" are available for the 30-minute pre-conference only. Moderators cannot verify or reload the recorded content after the start of the Event.
Troubleshooting Best Practices - Refreshing the EventBuilder bot.
- Confirm all Presenters have joined your Teams room and are connected to video and audio.
- Confirm the EventBuilder bot has joined your Teams room and is connected to video and audio.
- Confirm you can see and hear the presentation in the console previewer. If you can't, we recommend the following:
- Refresh your Moderator console by refreshing your browser. If this does not resolve the issues you're experiencing.
- Stop sharing content momentarily, then re-share.
- Refresh the bot to reset the connection if your Presenters are connected to the presentation environment and the bot has joined the Teams room, but Attendees are experiencing disruptions.
Note: Refreshing the EventBuilder bot can take up to a minute. A notification confirming receipt of request will appear on the top right of the Console:
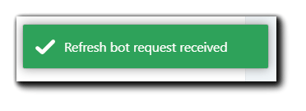
Once the refresh is complete, a second notification confirming the refresh has been completed will appear in the same location. 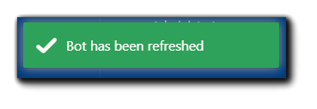
Troubleshooting for Individual Attendees:
Post an announcement to your Attendees before the stream starts:
"If you have issues viewing the presentation, please refresh your browser by clicking on the refresh button or by pressing CTRL+F5 on your keyboard. For additional troubleshooting assistance click the information icon on the bottom left, then click the Help button."
To assist individual Attendees experiencing difficulties, advise the following:
- Refresh your browser.
- Click the Help button on the information view of the Attendee Console to launch the system test page.
- Try connecting via a different browser.
- Ensure you are not viewing through a VPN.
- Audio is streamed via device speakers, check the connection and volume settings.
- Ensure speakers are unmuted and the volume is turned up.
Simulated-Live Mode
Simulated-Live events provide you the opportunity to present pre-recorded content while using the same Engagement Tools available in Streaming Mode events. Learn how to conduct a Simulated-Live Event.
.png)