Using EventBuilder With Teams Live Event
Last updated: April 27, 2023
Teams Live Event and EventBuilder work well together, providing Organizers with customized Registration pages, additional security options, and reporting capabilities. To maximize the benefits of both, it's important to understand how the two work together.
What EventBuilder Can Do with Teams Live Event
- Registration: Like Microsoft Teams, EventBuilder can be implemented with Teams Live Event to create advanced, customized registration pages, helping Organizers understand the scope of their event and plan for their presentation accordingly.
- Security: EventBuilder provides comprehensive event security options that can be set when building your event in our software. This is particularly helpful for a Teams Live Event that's promoted to those outside your company/organization.
- Reporting: The information collected at the time of registration and via EventBuilder's customized attendee communication emails captures data both pre- and post-event.
- Data Visualization Tools: Custom connectors for Microsoft Power BI are available to help Organizers bring the intelligence gathered from the event to life.
- Host Event Recordings: EventBuilder can host your event recordings for as long as your subscription is active.
- Event Production/Management: Juggling the organization, production, and presentation, as well as technical aspects of the broadcast and troubleshooting can be overwhelming. EventBuilder's team of professional event producers can assist your Teams Live Event with event management and technical support services.
Following are instructions and recommendations for using EventBuilder with Teams Live Event together for seamless event creation and delivery.
Teams Live Event
To start, Organizers will create their Teams Live Event and copy the unique Attendee join link from within their Teams client.
Teams Live Event Setup
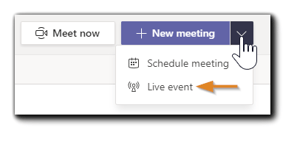
To create a new Teams Live Event, go to your Teams Calendar. In the upper right corner click on the drop down menu labeled 'New Meeting,' select 'Live event.'
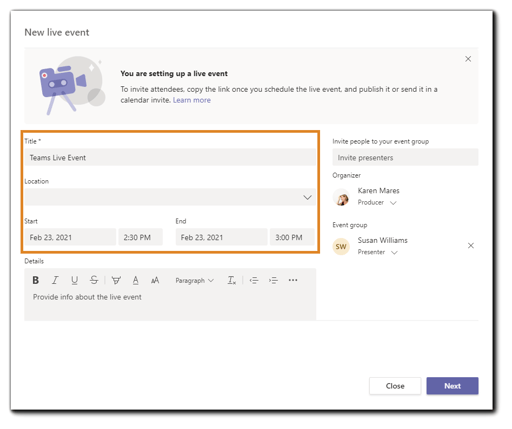
Enter event information.
Teams Live Event Roles
Organizers must assign Producers and Presenters to their Teams Live Event before the start of the live event. The Teams Live Event roles available:
- Organizer - Creates event and oversees scheduling, event permissions, and adding/inviting Producers/Presenters who will manage the event (Event Group).
- Producer - Host - controls the live stream, runs event production such as video, desktop shares, and layouts.
- Presenter - Presents audio, video, screen share, moderates Q&A.
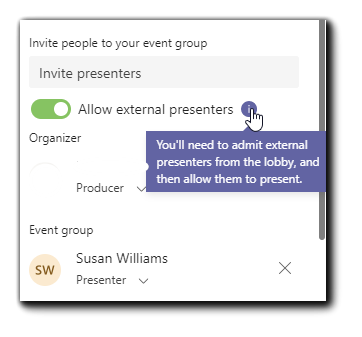
Enter the name or email of the Presenter(s) and/or Producer(s) you wish to invite. Select "Allow external presenters" if your presenter isn't on your tenant. Note: An external presenter will need to be admitted to the event from the lobby and allowed to present.
When finished, click 'Next.'
Event Permissions
Organizers have three choices for audience permissions in Teams Live Event: People and groups, Org-wide, and Public.
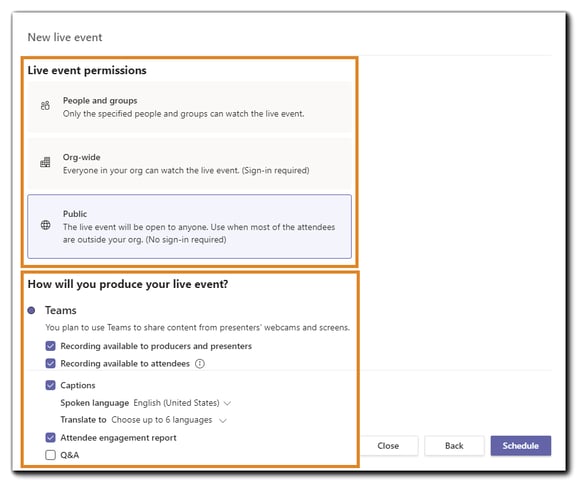
When using EventBuilder with Teams Live Event, we recommend the 'Public' permissions setting, and adding security with EventBuilder's Security options.People and Groups - Specific individuals within your organization (sign-in required).
Org-wide - Anyone in your tenant/domain, and anyone who has been granted Guest access (sign-in required).
Public - Anyone with the event link can join (no sign-in required).
Event Recording/Hosting
If you wish to make the recording available to Attendees for on-demand viewing via Teams Live Event hosting, select 'Recording available to attendees.'
If you prefer hosting your event recording with EventBuilder, leave the 'Recording available to attendees' option unchecked.
Learn more about hosting options.
Captions
EventBuilder-provided live captioning is not integrated into Teams Live Events. We recommend using the captioning available within Teams Live Events.
Attendee Join Link
Once your permissions and options are set, click on 'Schedule,' then select 'Get Attendee Link' on the Invite section. The link will be copied to your clipboard.
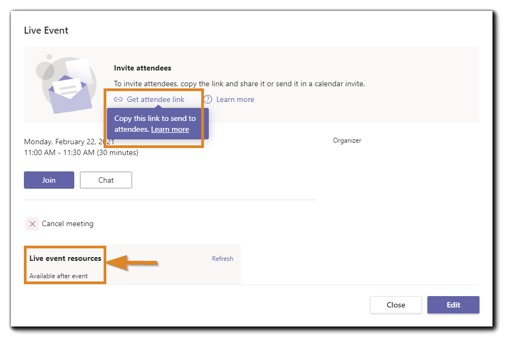
Note: Please ensure the Attendee link is copied into the Meeting Link field in your Event build. The 'Join' button is for Presenter access only.
Producer/Presenter Event Invites
Producers/Presenters added to your event will automatically receive an invitation with the live event link included within:

EventBuilder Setup
In your EventBuilder portal, navigate to your Events list, and select 'Create New Event.' On the Schedule step, add the copied Attendee join link in the Meeting Link field. The software will automatically detect it is a Teams Live Event.
Note: Because a Teams Live Event is a broadcast/streaming technology, EventBuilder Streaming and recording is disabled.

Next, select where your Event recording will be hosted: Teams Live Event or EventBuilder.
EventBuilder Hosting
EventBuilder can host your event recording with no expiration date or automatic deletion for as long as your subscription is active.
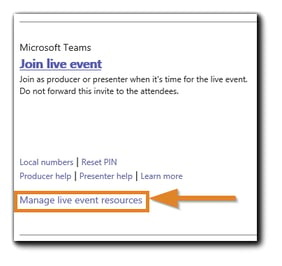
To host your recording with EventBuilder, go to Meeting Resources in Teams Live Event and download the file after the live event is over. Next, navigate to the Schedule step on your Event to upload the recording to EventBuilder hosting:

Teams Live Event Hosting
If you wish to host your event recording with Teams Live Event, add your event link and select 'Let Teams Live Event host my recording'

Transfer Recording from Teams Live Event to EventBuilder
Teams Live Event will host your recording for 180 days, after which the recording will expire and be deleted. Organizers are not notified of the pending expiration, nor is there an option to extend.
If your Teams Live Event-hosted recording is due to expire, EventBuilder will send a courtesy email reminder that it will be deleted soon.
If you wish to change the hosting location of your event recording from Teams Live Event to EventBuilder, you may do so at any time prior to the expiration on Teams Live Event. To preserve your event recording:
Navigate to your event recording on Teams Live Event and download the file to your preferred location.Note: Learn more about managing Teams Live Event meeting resources .
Next, navigate to and open the Event in your portal. On the Schedule step, uncheck the option, "Let Teams Live Event host my recording'
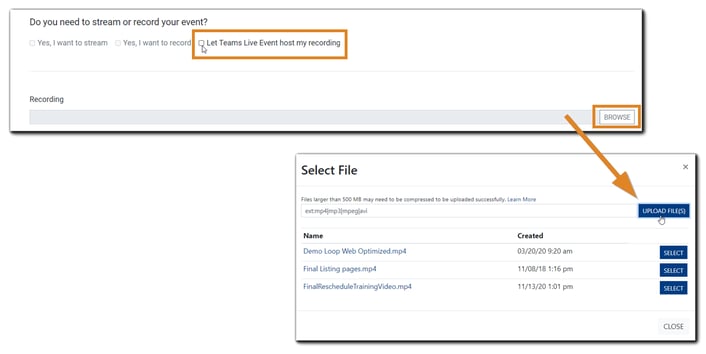
Select 'Browse' in the Recording field, then upload your recording using the Select File dialog.
Once upload is complete, the recording is now hosted with EventBuilder. Attendee access is available via the join link used for the live event.
Event Roles in EventBuilder
Event roles must be assigned within the Teams Live Event setup. Roles assigned in EventBuilder shown on the Registration page are for event promotion and marketing purposes only. They are not recognized by Teams Live Event.
To add Presenter/Moderator information to your Registration page, add the user via the Presenter/Moderator/Organizer section on the Schedule step.
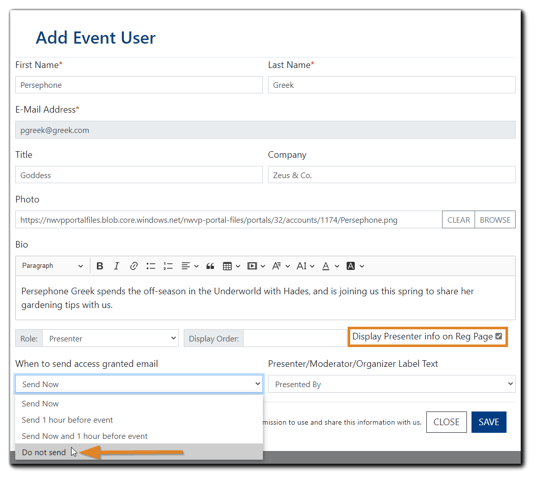
Select 'Display Presenter Info on Reg Page.'
On the dropdown menu labeled 'When to send access granted email' select 'Do Not Send.'
Security
EventBuilder's security options provide Organizers with tools to screen Registrants and control other Event details such as Registration maximums and waitlist management, while offering a Teams Live Event that is available to attendees outside your organization. (Public)
Any Security options offered through EventBuilder can be added to your Teams Live Event.
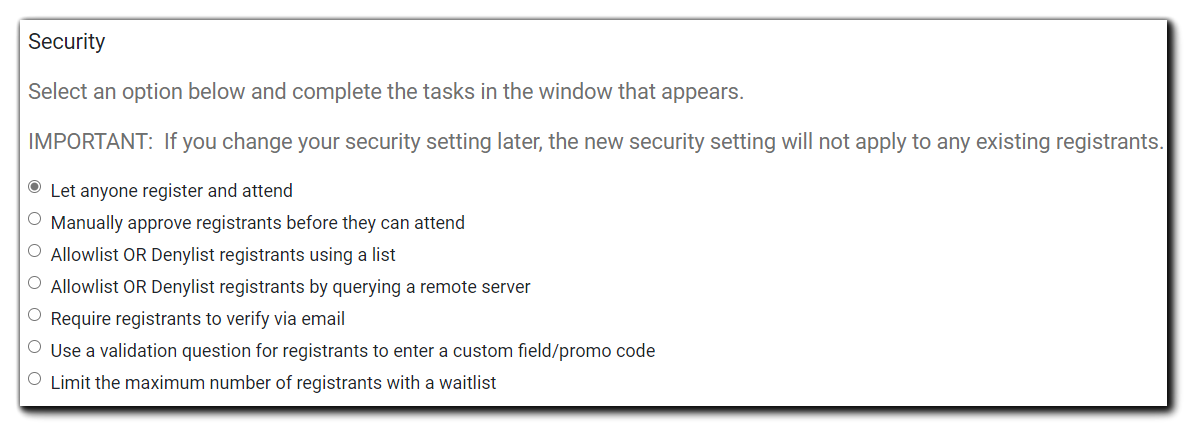
Available Security Add-ons include:
- Limit the maximum number of Registrants
- Two Factor Authentication
- Registration Close Date
- Registration Cancel/Edit Deadline
- Content Expiration

Post-Event Resources
Post-Event resources can be found in your Teams Live Event calendar item.
If configured, the following post-live event resources available include:
- MP4 of event recording
- Captioning files (WebVTT file and transcripts, including any additional languages)
- Any configured reports
Post-event, Organizers can use EventBuilder to:
- Host event recordings and make them available to attendees from the Registration page
- Produce Event Attendance report(s) (Reports step)
- Upload WebVTT files to add to event recording (Extras step)
- Transcripts in multiple languages can be uploaded to the Registration page as downloadable files (Engage step)
.png)